
Nail art designs can bring a completely new point of view to your manicure through unusual objects, crafted textures, decorative symbols, and carefully planned color. A strong design does not need to copy familiar flowers, French tips, blended centers, or metallic borders to feel stylish. It can begin with something unexpected, such as woven furniture, sharpened pencils, theatrical masks, vintage game cards, enamel jewelry, flowing sand, or antique coins.
Short square nails suit compact details, while oval and almond shapes provide more room for longer illustrations. The ideas below offer seven separate directions that can be adjusted for your preferred nail length, wardrobe, occasion, and level of maintenance.
Woven Cane Patterns for Warm Handcrafted Texture
Woven cane nail art takes inspiration from rattan chairs, basket panels, and open lattice furniture. Beige, honey, warm brown, black, and cream create a natural palette that pairs easily with linen, denim, neutral outfits, and gold jewelry.
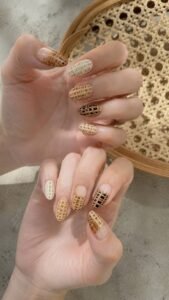
The pattern looks detailed without requiring bright color, and it can be painted flat for everyday comfort or lightly raised for extra dimension.
Draw Open Rattan Lattices
Begin with a creamy beige base, then paint narrow diagonal lines crossing in opposite directions. Leave small diamond spaces between the lines so the surface resembles open cane weaving.
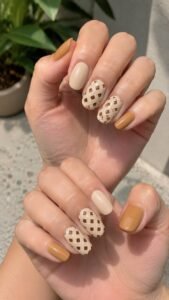
Add a warm brown outline around selected sections to create depth. Use the full lattice on two accent nails and paint the remaining fingers in honey, cream, or soft caramel for a balanced finish.
Build Curved Basket Panels
Curved basket panels use rounded rows instead of straight crossing lines. Paint several slim arches that overlap gently from the cuticle toward one side of the nail.
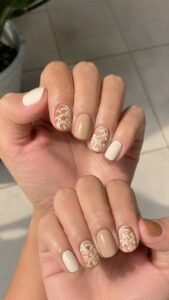
A darker shade beneath each curve can create the appearance of woven strips passing over one another. This variation looks graceful on oval nails and gives short rounded shapes a soft handcrafted character without adding bulky decoration.
Colored Pencil Shavings for Playful Artistic Detail
Colored pencil nail art brings a cheerful studio mood through sharpened tips, curled wood pieces, and bright pigment. Red, cobalt, yellow, green, violet, and orange can appear together when a pale background keeps every detail clear.
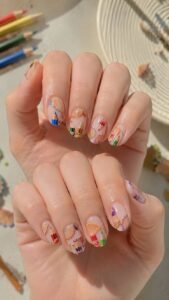
The theme feels creative without repeating crayon scribbles because the focus remains on realistic pencil shapes and delicate spiral shavings.
Curl Painted Shavings Across the Nail
Paint one thin spiral in pale wood brown, then add a narrow colored edge along the outside to resemble pigment left on a pencil shaving. Place the curl near one corner and allow part of it to extend toward the center.
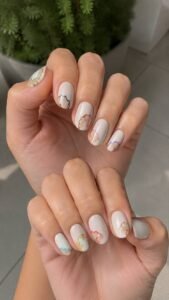
Change the color and direction on every decorated nail. A milky white or soft gray background will help each shaving appear crisp and dimensional.
Arrange Sharpened Pencil Tips
Create small pointed triangles with a wooden section and a bright colored center. Place two or three tips at different angles, as though pencils are entering the nail from the edge.
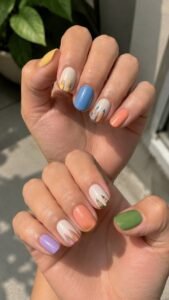
Keep the shapes slim so the design does not feel crowded. Use solid polish on nearby fingers in colors taken from the pencil tips to connect the manicure without repeating the full illustration.
Venetian Mask Motifs for Decorative Evening Glamour
Venetian mask nails introduce curved eye openings, ornamental edges, and rich evening color. Deep plum, black, ivory, emerald, red, and muted gold create a dramatic palette that suits dinners, celebrations, and formal styling.
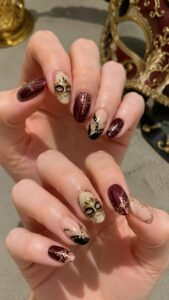
The masks should remain simplified rather than highly realistic, allowing the manicure to feel fashionable instead of theatrical. One complete mask on each hand is enough.
Paint Elegant Half Mask Profiles
Draw one sweeping mask shape across the side of an accent nail, including a narrow eye opening and a softly pointed outer edge. Use black over ivory for clear contrast or gold over deep plum for a richer result.
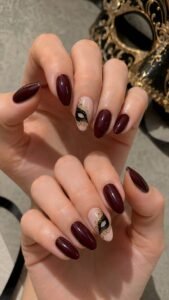
Add only a few curved marks near the border. Keep the surrounding nails smooth so the profile remains the main feature of the set.
Add Jeweled Eye Frame Details
A jeweled eye frame uses a small curved opening surrounded by painted beads, tiny gems, or metallic dots. Choose one main stone color, such as ruby, sapphire, or emerald, and keep the remaining accents neutral.
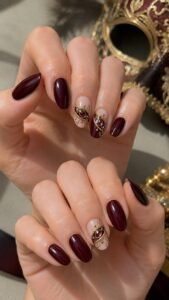
Position the frame near the center or upper corner. This compact version works beautifully on short nails because it suggests the mask theme without requiring a full face shape.
Vintage Playing Cards for Sharp Graphic Contrast
Playing card nail art creates a polished graphic look through suit symbols, corner numbers, divided portraits, and bold borders. Black, cream, red, navy, and faded gold give the manicure a collected vintage character.
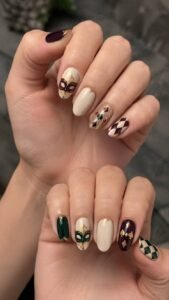
Square nails naturally support the rectangular layout, while almond nails can carry cropped card sections. Repeating one border color will keep different card images visually connected.
Frame Small Corner Suit Marks
Paint a tiny heart, club, diamond, or spade near one upper corner, then add a small number or letter beneath it. Use only one or two suits across the manicure to avoid a crowded result.
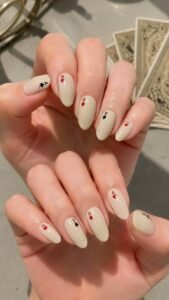
A cream background with black and red details feels classic, while navy and gold create a more unusual variation. Keep the marks neat and leave plenty of open space.
Split Face Card Illustrations
Divide one accent nail into two mirrored sections and paint a simplified face card using curved hair, a small crown, and blocks of clothing color. The portrait does not need realistic facial detail.
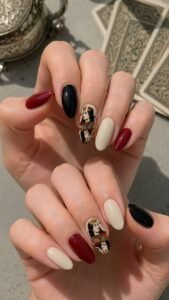
Use the same colors on both halves, then rotate the lower section to create the familiar card arrangement. Solid red, black, or cream nails will balance the detailed illustration.
Cloisonné Enamel Panels for Rich Jewel Tone Color
Cloisonné inspired nails use slim metallic outlines to separate glossy areas of saturated color. Unlike stained glass designs, these sections are smaller, more curved, and inspired by decorative enamel jewelry.
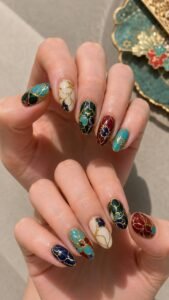
Emerald, turquoise, coral, navy, ivory, and deep violet create a luxurious palette. Gold outlines bring warmth, while silver gives the design a cooler and more modern appearance.
Fill Curved Enamel Compartments
Draw several connected gold curves across an accent nail, creating rounded compartments of different sizes. Fill each space with one glossy jewel tone, leaving the metallic line visible between colors.
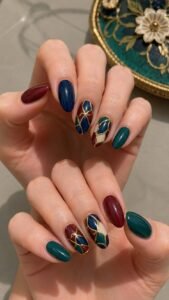
Avoid arranging the same palette in the same order on every finger. Use one complete panel per hand and repeat individual enamel shades across the remaining nails for visual balance.
Create Pendant Shaped Centers
Paint an oval, shield, or teardrop shape near the center of the nail, then divide it into three or four small colored areas. Surround the shape with a thin metallic outline so it resembles an enamel pendant.
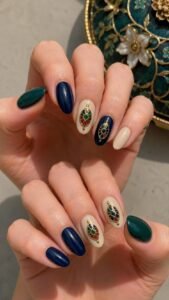
A deep navy base makes gold and bright color stand out, while cream creates a softer look. Keep the pendant low and smooth for practical daily wear.
Hourglass Scenes for Elegant Moving Detail
Hourglass nail art turns flowing sand and curved glass chambers into a graceful design with a quiet sense of movement. Amber, bronze, cream, black, smoky blue, and muted rose work beautifully together.
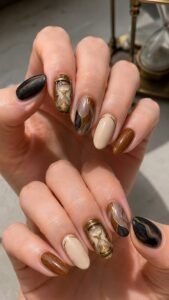
Long oval nails can hold a complete hourglass, while short nails look polished with one chamber or a narrow stream of sand. The concept feels decorative without relying on ordinary sparkle.
Paint Suspended Sand Chambers
Outline two rounded glass chambers that meet at a narrow center, then fill the lower section with warm amber or golden beige. Add a few tiny grains falling through the middle to create movement.
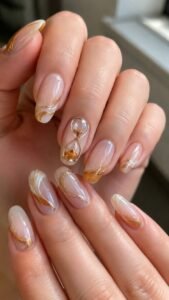
Use a clear or smoky background so the shape remains visible. Paint the complete scene on one nail and use smaller sand curves on nearby fingers.
Tilt the Frame Across an Accent Nail
A tilted hourglass creates a more dynamic composition by placing the frame diagonally from one corner to the opposite side. Paint the outer structure in bronze, black, or muted gold, then allow the sand to collect along the lower angled edge.
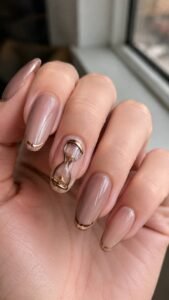
The unusual position makes the scene feel modern. Keep the other nails in one supporting shade to preserve the elegant focus.
Antique Coin Reliefs for Sculptural Metallic Style
Coin relief nail art takes inspiration from raised profiles, milled edges, stamped numbers, and aged metal surfaces. Bronze, pewter, muted gold, copper, and dark silver create depth without the mirror finish of chrome.
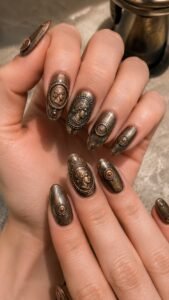
The design works best when the relief remains low and selected fingers stay simple. A matte or satin base helps the raised metallic details appear older and more textured.
Emboss a Side Profile Medallion
Create a shallow circular medallion, then shape a simple side profile inside it using low sculpting gel. Cover the entire piece in bronze or pewter and brush a darker tone into the recessed areas.
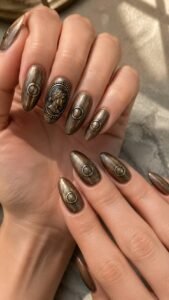
The face should remain symbolic rather than realistic. Use the medallion on one accent nail and add plain metallic circles or stamped marks on the surrounding fingers.
Add Milled Edge Impressions
Paint a metallic circle near the center, then place tiny repeated lines around its outer edge to imitate the ridged side of a coin. Add one simple number, star, or abstract mark inside.
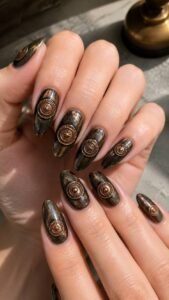
Copper over deep green feels warm, while silver over charcoal looks modern. Keep the impressions flat enough for comfortable wear and vary the coin size across the manicure.
Turn Your Next Manicure Into a Personal Style Story
The most interesting nail art designs begin with a clear source of inspiration and develop it through color, shape, finish, and placement. Woven cane patterns bring handcrafted warmth, while colored pencil details add playful creativity. Venetian masks create evening drama, playing cards provide graphic contrast, and enamel panels introduce jewel tone richness. Hourglass scenes suggest graceful movement, while antique coin reliefs offer sculptural character. Choose one idea that fits your routine, then simplify or expand the details according to your nail length. You can also explore related articles about hand care, nail shapes, jewelry combinations, hairstyles, outfit styling, and occasion beauty to build a complete look that feels personal and thoughtfully finished.
