
Regular nail polish designs can look inventive without thick sculpting, lamps, charms, or complicated salon materials. The most effective approach uses thin coats, controlled brush pressure, and enough drying time between colors so every mark stays clear. Sheer polish can create transparent depth, while opaque cream shades give small graphics a crisp edge.
Short rounded and square nails suit compact patterns, while oval and almond shapes provide more room for flowing lines and layered color. The six ideas below explore polarized cellophane, stenography marks, Chladni figures, dartboard scoring, balanced stone stacks, and capillary tubes. Each concept can be adapted with colors already in your collection, making the finished manicure personal, practical, and different on every finger.
Polarized Cellophane Designs With Transparent Color Tension
Polarized cellophane creates unexpected bands of violet, aqua, amber, rose, and green where transparent layers overlap. This nail idea translates that shifting color into thin lacquer shapes over a clear, cloudy, or smoky base.
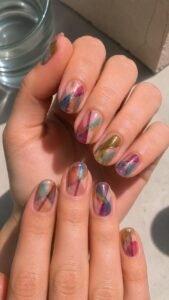
The design feels luminous without chrome or glitter because the interest comes from overlapping translucent polish. Keep every layer thin and let it dry completely before adding the next piece. Short nails can carry one cropped window, while longer shapes can hold several intersecting panels with generous clear space around them.
Cross Two Sheer Panels at Uneven Angles
Paint one transparent rectangle or long curved panel through part of the nail, then add a second color that crosses it at a different angle. The overlap should create a darker third shade without hiding either original color.
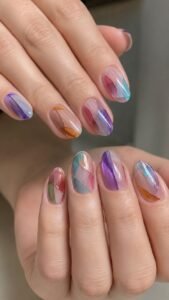
Aqua beneath violet produces cool depth, while amber beneath rose creates warmer light. Shift the crossing point across the hand so one intersection sits near the cuticle and another appears close to the tip. Repeating the same two main colors keeps the varied placement connected.
Outline One Stress Band With a Fine Curve
Add a narrow curved line around only part of an overlapping section, using cream, charcoal, or a deeper version of one transparent shade. The curve should follow the tension of the layered panels rather than forming a complete border.
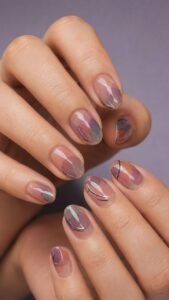
Keep it thin enough that the color beneath remains visible. On one accent nail, place two close curves with a clear gap between them. Nearby fingers can carry only a short fragment, allowing the detailed stress band to become a quiet focal point.
Leave a Clear Window Inside the Color
Create one small oval, triangle, or irregular opening that remains completely free of color inside a tinted panel. The clear space can sit near one edge instead of directly in the center, making the composition feel more natural.
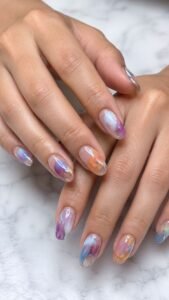
Add a soft highlight along one side with cloudy white polish to suggest light passing through the material. Use the full window effect on two nails and repeat only a tiny clear notch elsewhere, giving the manicure depth without making every finger identical.
Stenography Mark Designs With Swift Curved Movement
Stenography inspired nail polish designs use abbreviated curves, loops, hooks, and small dots to create a manicure that feels handwritten without relying on readable words. The marks can travel across a sheer base like quick notes taken in motion.
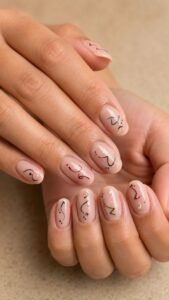
Indigo, burgundy, charcoal, olive, and cream work beautifully, although one vivid color can give the set a more playful mood. Keep the strokes narrow and slightly varied, since natural differences make the design feel personal. This concept suits every length because each nail needs only a few deliberate marks.
Sweep One Long Shorthand Curve
Paint a single quick curve that enters from one side, bends through the center, and ends before reaching the opposite edge. Use a fine brush with enough polish to complete the stroke without repeated tracing.
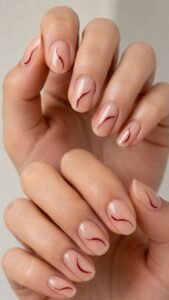
Change the direction across the hand while preserving a similar length and line weight. Deep blue over sheer beige feels classic, while red over cloudy pink creates a softer statement. Leave open space around the mark so its movement remains easy to see.
Pair Hooks With Small Reference Dots
Add one compact hook beside a group of one, two, or three dots. The dots can sit above, below, or inside the curve, creating a different shorthand unit on every finger.
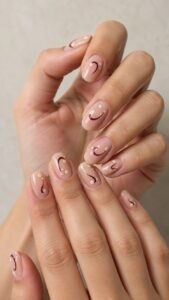
Keep their size consistent and avoid arranging them like ordinary polka dots. Use one color for the hooks and a second restrained shade for the reference marks. A tiny cream dot beside burgundy or olive lines can brighten the design without making it look busy.
Layer a Faded Correction Stroke
Brush a pale translucent line across part of one shorthand mark as though a note has been corrected or softened. The upper stroke should remain light enough for the original curve to show through.
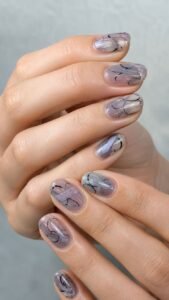
Place it diagonally on one nail and horizontally on another, keeping the correction color consistent. A cloudy lavender wash over charcoal or a warm beige veil over indigo can create subtle depth. Finish with clear gloss so the two layers appear joined rather than sitting separately.
Chladni Figure Designs With Nodal Sand Geometry
Chladni figures form when vibration organizes fine particles into symmetrical lines and empty zones. On nails, the patterns become delicate geometric networks that look structured without resembling a standard grid.
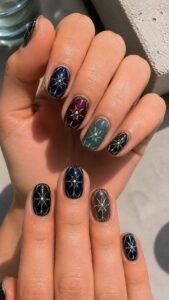
Cream, silver, black, cobalt, coral, and muted green create strong combinations. The design works best when one central axis or focal point guides the lines. Short nails can show a cropped corner of the figure, while longer shapes can carry a fuller arrangement. Keep the surface smooth and let painted spacing create the illusion of gathered particles.
Build Four Curves Around a Quiet Center
Choose a small central point and paint four matching curves that bend away from it toward the nail edges. Leave the middle clear so the lines appear organized around an invisible source.
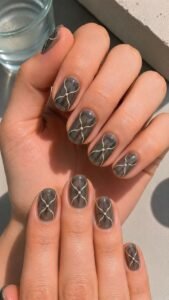
Use cream over charcoal for strong contrast or silver gray over a cloudy base for a softer version. The curves do not need to touch the side walls. Cropping them before the edges can make the figure feel larger and more mysterious.
Gather Fine Dots Along the Nodal Lines
Place tiny dots close to selected curves, concentrating them near the center and gradually increasing the space between them toward the edges. Keep the dots smaller than the lines so they look like particles collecting around the pattern.
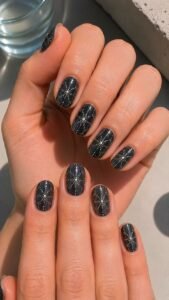
Use the same color for a subtle effect or add one brighter shade to a limited section. Coral particles beside cream lines or cobalt dots beside silver can create a controlled accent that remains refined.
Interrupt One Axis With a Color Pulse
Break one curve near its midpoint and place a short vivid bar inside the gap. The accent can be red, lime, violet, or bright blue, depending on the main palette.
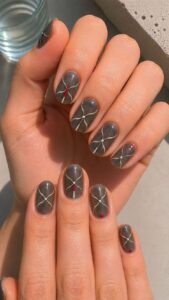
Repeat the same color as one tiny dot on two nearby nails so the interruption feels intentional. Keep the remaining curves complete and calm. This single pulse gives the scientific geometry a modern editorial detail without changing the balanced structure of the full design.
Dartboard Scoring Designs With Slim Color Wedges
Dartboard scoring nail designs use narrow wedges, divided rings, and one selected target area to create bold geometry with regular polish. The look can feel sporty in black, red, green, and cream or more refined in plum, rust, olive, and parchment.
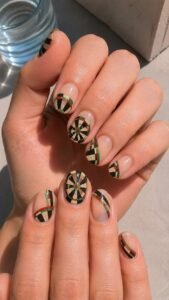
Round and oval nails naturally support the circular reference, while square shapes can show a cropped section that extends beyond the free edge. Avoid covering every nail with a complete target. Partial wedges and open base make the manicure lighter and easier to coordinate with outfits.
Divide a Cropped Circle Into Narrow Wedges
Paint part of a circle entering from one side or corner, then separate it into four or five slim wedge shapes. Alternate two related colors and leave a fine dark line between them.
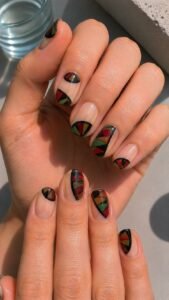
Let the largest section disappear beyond the nail edge so the imagined board feels wider than the surface. Change the crop across the hand, placing one circle near the cuticle and another at the tip. The repeated wedge scale will connect the different positions.
Add a Double Scoring Ring
Place two close curved lines across part of the wedges, leaving a narrow strip between them. Fill that strip with a stronger accent such as scarlet, forest green, cobalt, or gold cream.
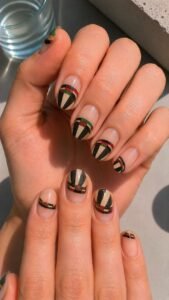
Keep the ring incomplete and allow it to stop before reaching both side walls. Use the full double ring on two accent nails and repeat only one small colored segment elsewhere. This selective detail gives the design a clear scoring zone without creating a heavy circular border.
Highlight One Winning Section
Choose a single wedge and deepen it with a richer shade or finish it with extra gloss while the remaining sections stay satin. Add a tiny dot near the pointed end to mark the selected area.
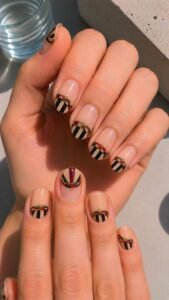
Move the winning wedge to a different position on the opposite hand so both sets feel related but not copied. A small amount of contrast is enough to create focus, especially when the surrounding base remains sheer or softly neutral.
Balanced Stone Stack Designs With Calm Color Weight
Balanced stone stack nail polish designs use rounded shapes, changing scale, and carefully placed shadow to create a quiet manicure with modern structure. Unlike a speckled mineral pattern, this concept focuses on complete smooth forms that appear to rest against one another.
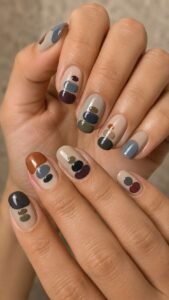
Clay, smoke blue, cream, moss, plum, and charcoal can create either an earthy or more graphic palette. Short nails suit stacks of two forms, while longer nails can hold three or four without losing open space. Keep the shapes flat and let shading suggest weight.
Stack Rounded Forms Off Center
Paint two or three smooth shapes near one side of the nail, placing the largest at the base of the stack and the smallest above it. Avoid perfect circles, since slightly flattened edges make the forms appear balanced rather than dotted.
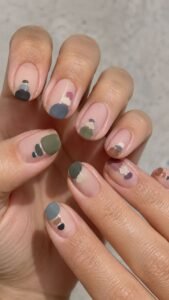
Change the leaning direction from finger to finger while repeating the same palette. Leave enough bare or sheer base around the stack so every outline remains visible and the manicure feels calm instead of crowded.
Add a Narrow Contact Shadow
Place a soft dark line where one painted stone meets another, keeping the shadow shorter than the full width of the shape. Use smoky brown beneath cream, deep green beneath moss, or charcoal beneath blue.
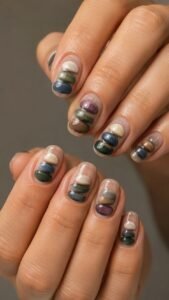
A tiny highlight on the opposite upper edge can strengthen the illusion of weight. Keep the imagined light direction consistent across both hands. This careful shading creates dimension even though the regular polish surface remains completely smooth.
Separate One Floating Stone
On an accent nail, lift the smallest painted form slightly above the rest of the stack and leave a clear gap beneath it. Add a faint translucent shadow below the floating piece so it still belongs to the composition.
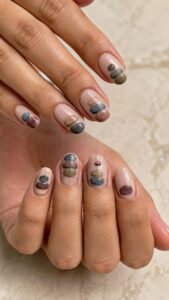
Repeat its color in one grounded stone on another finger. The unexpected space creates visual tension and makes the set feel artistic without adding charms, raised pieces, or complicated tools.
Capillary Tube Designs With Suspended Color Columns
Capillary tube nail designs use narrow transparent channels, curved liquid surfaces, and changing fill levels to create a clean laboratory inspired manicure. Clear, pale blue, rose, amber, emerald, and smoky violet work especially well because regular polish can build the color in thin layers.
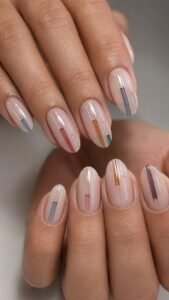
Square nails support straight columns, while almond and oval shapes make them appear longer and more delicate. Keep the tubes separated by open base and use only a few per nail so the design remains crisp.
Paint Slim Tubes at Different Heights
Create two or three narrow vertical channels using a faint gray, white, or clear outline. Begin them at changing points so one tube rises from the free edge while another starts near the cuticle.
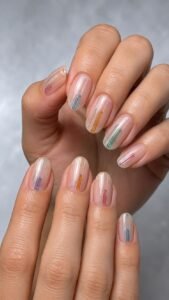
Fill only part of each channel with translucent color, leaving the remaining section clear. Repeat the same outline width across the hand but change the liquid height. This simple variation creates movement without requiring a different palette on every nail.
Curve the Meniscus at the Surface
At the top of each colored column, paint a small curved line that dips gently in the center or rises toward the middle. Keep the meniscus delicate and use a slightly deeper version of the liquid shade so it remains visible.
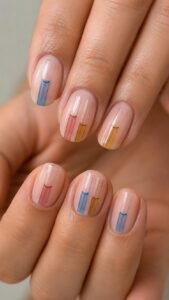
Blue, amber, and rose can each carry a different curve while sharing the same clear tube outline. On shorter nails, one carefully shaped liquid surface can provide enough detail without adding a second channel.
Trap One Tiny Air Gap
Leave a narrow clear space inside one colored column, then continue the liquid above it. Outline the gap lightly so it appears suspended within the tube rather than left unfinished.
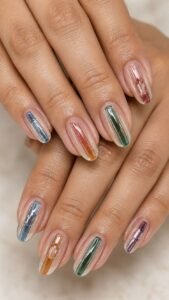
Use the complete air gap on only one or two accent nails and keep the other columns uninterrupted. A glossy top coat will sharpen the transparent section and make the layered color look deeper while preserving a practical flat finish.
Let Regular Polish Show What Careful Painting Can Do
The most distinctive regular nail polish designs use simple lacquer in ways that celebrate transparency, brush movement, and personal variation. Polarized cellophane creates layered color tension, while stenography marks bring quick handwritten rhythm.
Chladni figures introduce balanced geometry, dartboard wedges add controlled graphic contrast, and stone stacks create calm visual weight. Capillary tubes complete the collection with clear channels and suspended color.
Choose the concept that matches your available shades and painting confidence, then reduce it to two or three accent nails when you prefer an easier manicure. Related inspiration for nail polish colors, short nail ideas, nail shapes, nail tips, stickers, extensions, manicure care, and outfit styling can help you build a complete beauty look around the finished design.
